How to Control Mac with iPhone using Screen Sharing
You are lounging on your couch, Mac across the room, and suddenly you realize you need to access something urgently on your Mac. Instead of getting up and crossing the room, wouldn’t it be awesome if you could simply grab your iPhone and take control of your Mac? Well, this is only possible if you know how to control Mac with iPhone. In this guide, we will explore how to control your Mac using your iPhone.
What is the point of Controlling Mac with iPhone:
Before I explain how to control Mac with iPhone, let me discuss what you can achieve by accessing you Mac through your iPhone.
Here are some awesome benefits that’ll make you wonder why you didn’t start doing this sooner:
Ultimate Convenience:
Controlling your Mac with iPhone is an overall convenience. Whether your are sipping coffee in the kitchen, or giving a presentation in the boardroom, your iPhone almost becomes a versatile remote control for your Mac.
Remotely Accessing the a file on Mac:
You are working somewhere else and all of a sudden you need reference information from the file that is actually present in your MacBook. You have the option to remotely access that file if you have remote control over your Mac with the iPhone that is almost always with you.
Offering Technical support to others:
A friend of you have run into some issue on his Mac and asked you for help. You can remotely access his Mac on your iPhone to troubleshoot and fix the issue.
Effortless Multitasking:
You needed to quickly access a file on your Mac while your hands are busy on your phone? No problem! With remote control, you can effortlessly switch between tasks on both devices without missing a beat.
Impress Your Friends:
Let’s face it, controlling your Mac with your iPhone is just plain cool. Show off your tech prowess and leave your friends in awe as you perform magical feats of remote control of your Mac. Now you will be at odds with a friend who impressed you in the past with a similar tech trick.
Control Mac with iPhone using screen sharing: Step by Step
Now let’s set up controlling Mac with iPhone, here is the step by step Process
- Open the app store on your iPhone, find and download “RealVNC Viewer”, remote desktop app, alternatively download from the official VNC website.
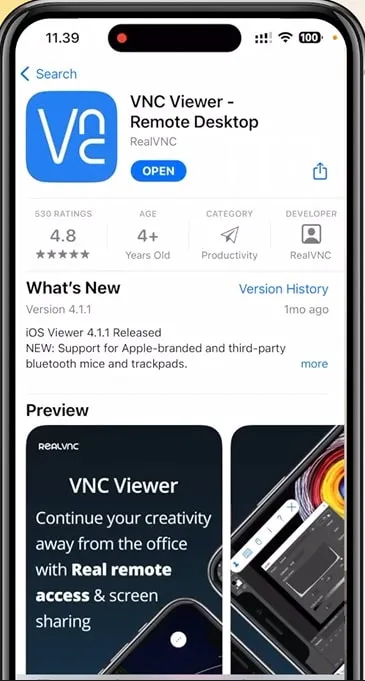
- Install RealVNC Viewer on iPhone, now run the app and click “allow” to give it permissions
- Switch to Mac and open up “System Settings” (formerly known as System Preferences)
- Navigate to “General”, and then “Sharing”.
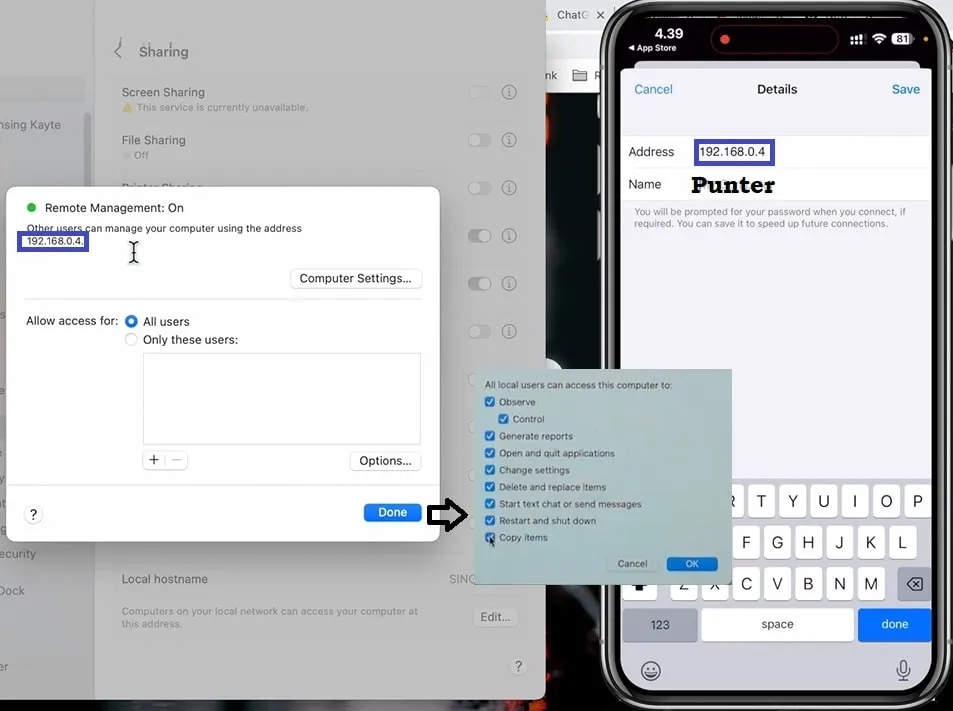
- Enable “Remote sharing” and “Remote Management”
- Now click on the small encircled “i-button” in front of remote management
- Here, keep “all users” select or add users through the “only these users” to give permissions to
- Underneath the users, click on “options”
- Select the “types of permission” that you want to grant for remote access
- Press “ok” , you will get to the permission, at the top “note down the IP address”
- Switch to iPhone, on RealVNC Viewer, navigate to “Address Book”
- Now add your Mac device “IP address” and “Name” and press “Connect”
- You’ll be prompted for Mac “user name” and “password” , enter the detail and connect
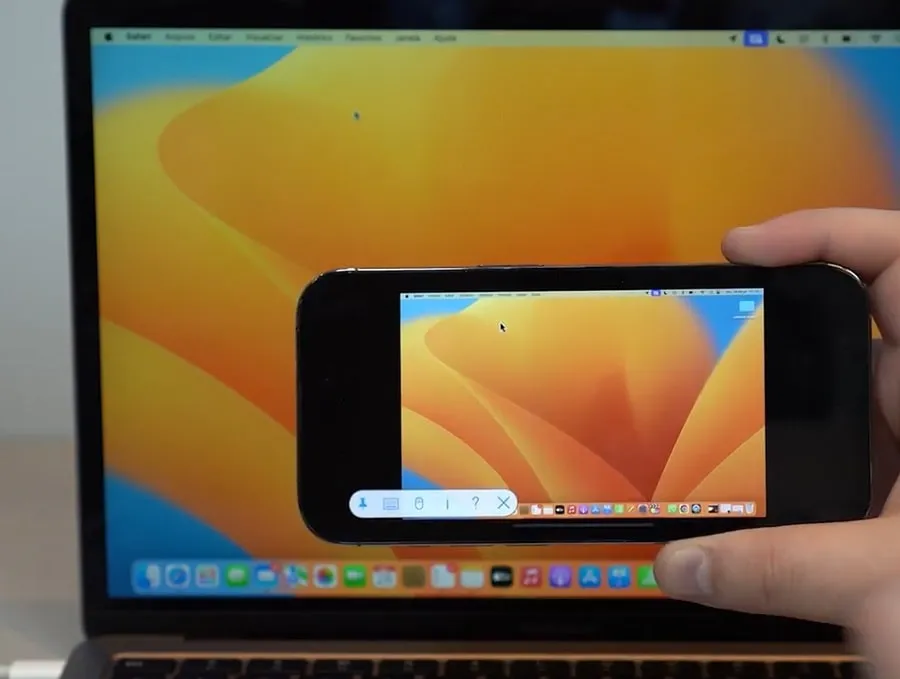
- Now you will be able to see the Mac, screen on your iPhone, just use it as you wish.
Please Note that you can use many other remote applications to control Mac with iPhone. Some of the most popular once include:
- Remote Desktop
- Google Chrome
- Team Viewer
- Splash
Start to control Mac with iPhone:
Now that you have set everything up, start the control over your Mac with the iPhone.
Navigate through Mac’s Interface:
It is almost like having a mini version of your Mac right on your iPhone screen. You can navigate through Mac menus, open applications, and interact with your Mac’s desktop just as if you were sitting in front of it. Easy isn’t it.
Launch and Manage Applications:
Need to open up a specific program or switch between different apps? No problem! With screen sharing, you can launch applications, switch between the Apps on Mac, and even close them down if needed, all from the convenience of your iPhone.
Access Files and Folders:
Whether it is that important document you forgot to email yourself or a folder buried somewhere deep inside your Mac folders, now you can access and manage files and folders with ease. You can open files, move them around, and organize files and folders right from your iPhone.
Control Media Playback:
Want to start playing your favorite playlist or pause that YouTube video? With screen sharing, you have full control over media playback on your Mac. You can play, pause, adjust volume, and even skip tracks without touching your Mac directly.
Type and Input Commands:
Need to type out an email or execute a command in the Mac Terminal? No need to fumble with an on-screen keyboard on your iPhone. With screen sharing you can type directly on your Mac’s keyboard using your iPhone.
Troubleshoot and Assist Remotely:
If a friend or colleague is facing an issue on his Mac and you are trustworthy enough form him (Lolz), he can grant you the access to his Mac. You can troubleshoot the tech and fix the issue for him.
Customize Settings and Preferences:
Want to change your Mac’s display settings or adjust the system preferences? Screen sharing lets you do that as well. Just get into your Mac’s settings and customize settings to your liking, just as if you were sitting in front of your Mac.
Collaborate and Present:
Screen sharing isn’t just for remote control. If you are working on a project with teammates or giving a presentation to clients, screen sharing allows you to share your Mac screen with others for collaboration live, all from your iPhone.
Tips for Smooth Operation:
Here are some tips for smooth operation when controlling your Mac with your iPhone using screen sharing:
Stable Wi-Fi Connection:
Make sure both your iPhone and Mac are connected to a stable Wi-Fi network. A shaky connection can lead to lag and interruptions in your screen sharing session, making it frustrating to use.
Keep Devices Updated:
It is good to keep both your iPhone and Mac updated. Updates often include bug fixes and improvements that can enhance the performance of screen sharing as well overall functioning.
Close Unnecessary Apps:
Screen sharing does use some of your system resource, to avoid any slowdowns or distractions, close any unnecessary apps or programs running on your Mac before initiating the screen sharing session. This will help you spare enough resources that your Mac can allocate for screen sharing process.
Adjust Screen Resolution:
Depending on your internet connection and the devices involved, adjusting the screen resolution can improve performance. You can experiment with different resolutions to find the best balance between quality and speed.
Use Landscape Orientation:
When using your iPhone to control your Mac, it is advisable to use landscape orientation for a wider view of your Mac’s screen. This can make navigating and interacting with your Mac’s interface more comfortable and efficient.
Optimize Settings:
Explore the settings of your screen sharing app to optimize the experience. Some apps come with options to adjust image quality, frame rate, and other settings that can set the screen sharing session to your preferences and device capabilities.
Keep Sufficient Battery Life:
Starting a screen sharing session, make sure both your iPhone and Mac have sufficient battery life to avoid interruptions. Consider charging your devices beforehand or connecting them to power sources during longer sessions.
Use a Secure Connection:
Most of the applications are secure but it is always advisable to exercise caution. If you are accessing your Mac remotely over the internet, you can use a virtual private network (VPN) for encryption. Alternatively, choose the screen sharing app that employs encryption to protect your data from unauthorized access.
Use stronger longer and complex passwords:
Set up more secure, complex and strong passwords for the users having the remote access privilege.
Wrapping Up:
After going through the detailed steps of how to control your Mac with your iPhone using screen sharing, it’s time to wrap things up. Here are some key takeaways to remember:
- With screen sharing, you have the power to access and control your Mac from anywhere, offering unparalleled convenience and flexibility in your daily tasks.
- Whether you are sipping coffee in the kitchen or giving a presentation in the boardroom, your iPhone becomes a versatile remote control for your Mac, making multitasking effortless.
- Impress your friends with your tech skills by demonstrating the magic of controlling your Mac with your iPhone. It’s not just practical; it’s also undeniably cool!
- From navigating through your Mac’s interface to launching and managing applications, accessing files and folders, controlling media playback, and troubleshooting remotely, the possibilities are endless with screen sharing.
- Keep your screen sharing sessions running smoothly by ensuring a stable Wi-Fi connection, keeping devices updated, closing unnecessary apps, adjusting screen resolution, optimizing settings, maintaining sufficient battery life, and prioritizing security with secure connections and strong passwords.