How to Snip on Mac: Master Mac Snipping Tool with Shortcuts
Whether you’re trying to save a funny meme, share a particular section of a webpage or screen, showcase a software feature, or document a step-by-step process, learning how to Snip on Mac is like acquiring a superhero sidekick for your screen. Snipping on a Mac, just like on any other operating system, is your secret weapon for crystal-clear communication. It not only boosts personal productivity but also enhances communication by enabling you to share visual information with clarity and precision.
After reading this detailed guide, you’ll gain insight into every aspect of snipping on a Mac
Confusion about snipping tool on mac:
The confusion about the snipping tool on Mac originates from the different terms used to describe the functionality on various operating systems. On Mac, the official term used by Apple is “screenshot toolbar.” However, some folks and other sources might call it the “snipping tool” because it acts like snipping tools on different systems, so there’s room for confusion. Nonetheless, it serves all purposes whether you call it a “snipping tool” or “screenshot toolbar.
How to snip on mac
Basic snipping on mac with hot keys
To begin with, let’s dig into the art of snipping on a Mac through the use of keyboard shortcuts, also known as hotkeys, offering swift and convenient solution.
How to capture full screen on your mac with keyboard ?
Follow the steps, to capture your entire screen on Mac:
- Press and hold Shift + Command + 3 keys at the same time.

- MacOS will capture an image of your entire screen and a small preview of the image will appear in the bottom right corner of your desktop screen. You can make edits, copy, or clip the image.

- Your screenshot will automatically save to the desktop (by default location) If you miss the preview.
You can also learn “How to copy/cut/paste on mac using keyboard shortcuts”, here
How to Capture a specific Part of the Screen ?
Follow the following steps, to capture to capture specific part of the screen on Mac;
- To take a screenshot of a part of your screen, hold down Shift + Command + 4 together.

- Your cursor will change from an arrow to a crosshair. Click on the specific area you want to capture and drag your cursor it over the full area that you want to include in your screenshot.
- Release the button on your mouse, your computer will take the screenshot and save it to default location.
How to take a screenshot of a selected window?
Follow the steps, to take screenshot of selected windows on your Mac;
- Hold down Shift + Command + 4
- Press and release the Spacebar.
- The crosshair cursor will change to a camera icon. Hover the camera over the window you want to capture
- Click on it to take your screenshot.
- To avoid capturing the shadow of the window, click while holding while you are holding Option Key.
- Simply Press Esc Key to cancel taking screenshot
Advance snapping on mac with “screen shot” snipping tool:
Let’s dive into more advanced approach for snipping on macOS. macOS has a powerful, user friendly built-in alternative to the traditional Snipping Tool, called the “Screenshot Toolbar.”

The default snipping tool on macOS “Screenshot Toolbar” provides additional features and a user-friendly visual interface compared to straight forward keyboard shortcuts. It’s like the cool alter ego of the Snipping Tool but with a snazzy Mac twist. “Screenshot Toolbar” on macOS isn’t just about capturing but doing it in style, allowing mac users to capture the entire screen, specific window ,selected portions on mac screen, time delay and video recording effortlessly. To access “Screenshot Toolbar” just press Shift + Command + 5 shortcut.
How to take a snip on a Mac with the snipping tool “screenshot toolbar”
- Press Shift + Command + 5 to access screenshot toolbar on mac
- Majority of your screen will be darkened; multiple screen options with a highlighted rectangle icon will appear in the middle of the screen.

- To capture your full screen or a specific window, Select appropriate icon (rectangle) that matches your needs.
Screen Capturing videos on a Mac:
You know that cool “screenshot toolbar” on your MacOS takes screenshots? Well, it’s not just for snapshots; it’s like a Swiss Army knife for recording your screen too! You can also make videos of whatever’s happening on your screen. You can use “screenshot toolbar” on your macOS to create tutorials, document software issues, or share memorable or funny moments. It essentially provides both static and dynamic ways to capture and share digital experiences on your macOS.
To Screen Capture videos on Mac with snipping tool “screenshot toolbar” follow these steps
- Press Shift + Command + 5 to bring up “screenshot toolbar”
- find the screen recording icons or right side of “screenshot toolbar”
- click ‘Record Entire Screen icon’ to record full screen video
- click ‘Record Selected Portion icon’ to record custom are on screen only
- To stop recording, click Shift + Command + 5 again
- and click the Stop icon
Screen recording will be saved at the default location
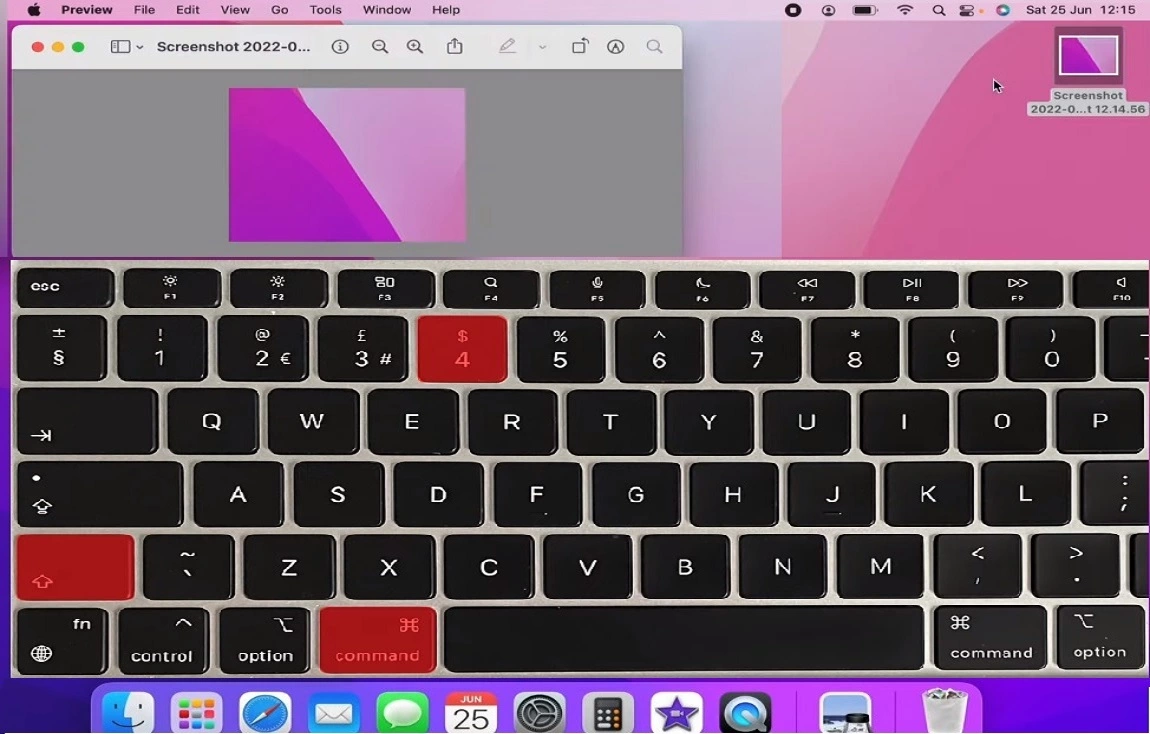
How to Take a Screenshot with Touch Bar on Mac
If you have a macbook with touch bar, you can easily capture you screen easily with “screenshot icon” present on your mac.
To take screenshot with touch bar;
- Tap the “screenshot button”
- click on the window you want to take screen

- click “capture” on “screenshot toolbar” to take the screenshot
- Screenshot will be saved to the default location
How to take screenshot of the Touch Bar
There are situations where you want to show your touch bar to someone. In such situations simply press “Shift + Command + 6” and your touch pad image will be saved on the default location, showing all the items on you touch bar.
Snipping screenshots with Third-Party applications on mac
If you’re always snapping screenshots or recording your screen, spice things up with some cool third-party apps, exploring third-party applications can offer enhanced features and flexibility compared to the built-in “screenshot toolbar” options on Mac.
Consider exploring popular third-party snipping tools such as Cleanshot X, TextSniper, Greenshot, Capto, Droplr, Lightshot, SnagIt, and Dropshare, they’re like the superheroes of screen stuff. These tools often provide advanced editing capabilities, with fancy editing tricks, different ways to grab your screen (even scrolling captures!), and instant sharing options with integrated cloud services, meeting your customized needs.
You can download Cleanshot X here.
How to add the snipping tool (screenshot toolbar) to the Touch Bar

If you’ve a MacBook with a Touch Bar, you can make taking screenshots easier with just a few simple steps.If “screenshot icon” is missing on your touchpad follow these steps to bring the “camera icon” to you touch pad.
- Click the apple logo
- click system preferences
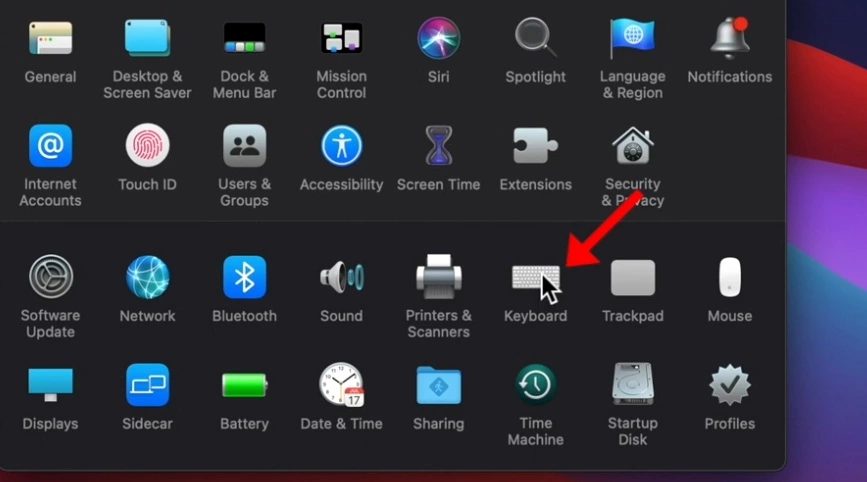
- then click keyboard
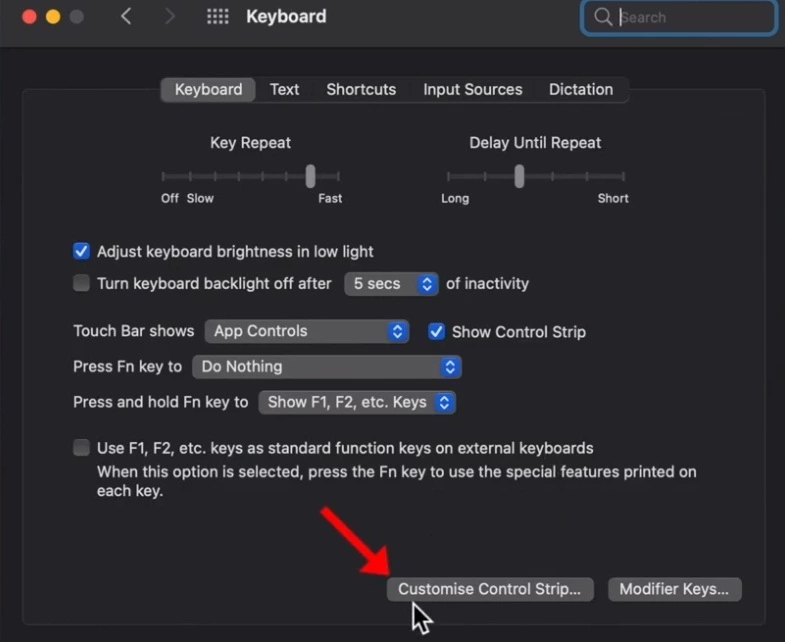
- find and click “customize control strip”, a popup will appear
- find “screenshot icon”
- drag the “screenshot icon” to touch bar using the track pad
- click done button
Automating snipping on with scheduled captures
Some Mac users choose to automate snipping or screenshot captures, just like a trusty sidekick that keeps an eye on things regularly with scheduled routines for efficient and systematic monitoring.
Whether you’re a design guru, a coding wizard, or part of a dream team, scheduled captures may serve as a secret weapon for visual reports and progress tracking. This automated process is like having a reliable buddy who never misses a beat, even working when you’re taking a break.
This approach is particularly valuable for tasks requiring regular observations, such as dynamic content changes on websites, logging time-sensitive data like stock prices, or creating detailed records of evolving information. It ensures consistency and reliability, reduces the risk of oversight, and allows for unattended operations, especially during off-hours.
How to automate snipping on a Mac with scheduled captures with Screenshot Tool:
- Press “Shift+Command+5” to open the Screenshot tool
- Find the timer option available in the Screenshot Toolbar
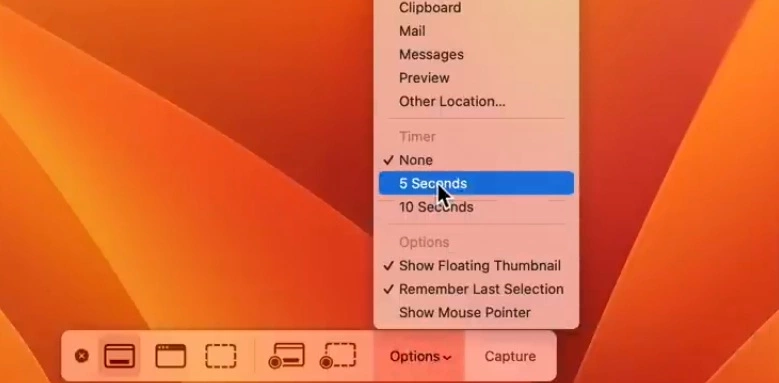
- Schedule captures at specific intervals
- Scheduled captures will be saved at the default location
Changing the default location for saving screenshots on mac
Switching up the default storage of those sneaky captures is like giving your Mac a snazzy makeover, but can be a smart move for simple reasons. First off, changing the default “desktop” location for saving screenshot, by placing them in specific folders is the ultimate solution for turning chaos into order. This is particularly handy if you work on different projects and want to keep things neat.
It also lets you manage your computer’s storage better, ensuring that important files are stored where you want them, making you the commander of your computer’s storage space. For privacy and security of your data, you can choose a location or a folder with restricted access, no Worries about nosy intruders.
Changing the default storage for these screenshots is like customizing your computer to fit how you like to work and keeping things organized and easy to find when you need them.
Your screenshots are automatically saved to your desktop.
To select a different location for saving screenshots on mac:
- Press Shift + Command + 5 to bring on “screenshot toolbar” on mac
- Then click on Options, a dropdown menu will appear
- Find “Other Location” at the top of dropdown menu
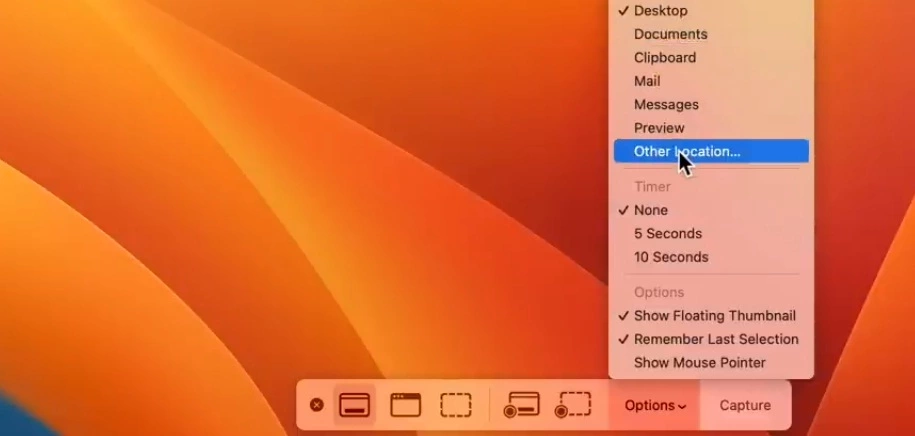
- choose preferred location from several destinations
- You can also click on “Other location” option to choose a custom save location.
How to Change the Default File Name for Screenshots:
The default file names generated by the system are usually generic and based on the date and time, probably like a mystery novel – all about dates and times, leaving you guessing what’s inside.
So, why not give them a personal touch by customizing the file names and creating a more meaningful and descriptive system, making it easier to find when you need them.
- Open Terminal
- type the following command “defaults write com.apple.screencapture name “your custom name”
- Replace “your custome name” with the name of your own choice
- Hit enter
- restart the system UI with “killall SystemUIServer” command on terminal
Summary:
- The article covers various scenarios on ‘how to snip on Mac‘, ranging from basic screen captures to advanced techniques and personalization options.
- Mac users utilize the ‘Screenshot Toolbar’ as the basic snipping tool. A small confusion exists because Apple refers to it as the ‘screenshot toolbar.’
- A simple method for snipping on Mac involves using hotkeys (keyboard shortcuts) to capture the full screen, a specific part, or a selected window.
- The advanced method utilizes the snipping tool on Mac called the ‘Screenshot Toolbar,’ providing features like time delay, video recording, and capturing specific portions with ease.
- For MacBooks with a Touch Bar, users can easily capture screens using the ‘screenshot icon’ present on the Touch Bar.
- Third-party applications like Cleanshot X, TextSniper, and others can also be used for snipping on Mac, offering enhanced features for screen capturing.
- Mac users can automate screenshot captures with scheduled routines using the ‘Timer’ option on the ‘Screenshot Toolbar’ for regular monitoring and observations.
- The default screenshot storage location on Mac can be customized using ‘Screenshot Toolbar’ options. Default file names for screenshots can also be changed for better identification using ‘Terminal’ on Mac.
Frequently asked questions:
How to Recover Deleted Screenshots on MacBook
1. Check the “Recently deleted” folder: Screenshots are stored there for 30 days before permanent deletion.
2. Use Time Machine: If you have it set up the Time Machine, it can restore deleted screenshots from a previous backup easily.
3. Try Third-party software: If basic steps fail, use third-party recovery tools like Disk Drill or EaseUS to retrieve deleted screenshots on mac.
Is there a snipping tool on my Mac?
Yes, Mac computers have a built-in screenshot tool that serves similar purpose to a snipping tool, officially referred to as the “Screenshot Toolbar.
How do I snip and paste on a Mac?
Use the “Command + Shift + 4” keyboard shortcut to snip a specific area, Shift + Command + 3 keys to snip whole mac screen. Paste the snipped content using “Command + V” wherever you want.
How to Use the Snipping Tool on a Mac ?
1. Activate the Screenshot Toolbar by pressing “Shift + Command + 5” to open the Screenshot Toolbar.
2. Select the desired snipping option (e.g., Capture Entire Screen, Capture Selected Window, or Capture Selected Portion).
3. Press “capture”, after capturing, you can either edit the screenshot or allow it to be saved to your chosen location.
![How to delete Epson software from Mac: [Complete Guide]](https://macuncover.com/wp-content/uploads/2024/01/How-to-delete-Epison-from-Mac-min-768x552.webp)


3 Comments